Installing MySQL8 into Your Newly Cloud Server
Experiment on Droplet Digital Ocean Ubuntu 20.04 and Connecting from Navicat Tool
In the previous post, we have introduced you to steps to own your first digital ocean cloud server or droplet. Now we want to guide you to install MySQL database version 8 into your newly created droplet in digital ocean or EC2 in amazon web services (AWS). As you might already know, MySQL is an open-source relational database management system which wisely used and outperformance compare to others database management systems (DBMS). You can use MySQL to store your data such as posts of your website, information of visitors, and documents you shared with visitors. Furthermore, in this post, we will configure MySQL to allow connection from the local computer in order to manage it. This is beneficial when you are in development mode trying to connect to the MySQL server from the development server.
Most DBMS always have their own pros and cons due to the comparison and market competition. Popular DBMS always keep promising with their users by release new features and update/upgrade the older versions of their products. MySQL also the same as others, keep update and improve features such as data security, on-demand scalability, high-performance support, or reduced total cost of ownership, etc. Whitepaper or research blog posts can help the owner of an eCommerce or web application that performs poorly and help to identify by help for performance tuning, security audits, and optimizing queries, etc.

Step 1: Connect to your droplet
ssh root@your_server_ipaddress
Step 2: Update your server
sudo apt update

Get:1 http://mirrors.digitalocean.com/ubuntu focal InRelease [265 kB]
Get:2 http://security.ubuntu.com/ubuntu focal-security InRelease [114 kB]
Hit:3 http://mirrors.digitalocean.com/ubuntu focal-updates InRelease
Hit:4 http://mirrors.digitalocean.com/ubuntu focal-backports InRelease
Fetched 379 kB in 1s (297 kB/s)
Reading package lists... Done
Building dependency tree
Reading state information... Done
21 packages can be upgraded. Run 'apt list --upgradable' to see them.
Step 3: Installing MySQL8 APT Repository
wget https://dev.mysql.com/get/mysql-apt-config_0.8.17-1_all.deb
sudo dpkg -i mysql-apt-config_0.8.17-1_all.deb
sudo apt-get update

Get:1 http://repo.mysql.com/apt/ubuntu focal InRelease [12.2 kB]
Get:2 http://mirrors.digitalocean.com/ubuntu focal InRelease [265 kB]
Get:3 http://security.ubuntu.com/ubuntu focal-security InRelease [114 kB]
Get:4 http://repo.mysql.com/apt/ubuntu focal/mysql-8.0 Sources [963 B]
Hit:5 http://mirrors.digitalocean.com/ubuntu focal-updates InRelease
Hit:6 http://mirrors.digitalocean.com/ubuntu focal-backports InRelease
Get:7 http://repo.mysql.com/apt/ubuntu focal/mysql-apt-config amd64 Packages [566 B]
Get:8 http://repo.mysql.com/apt/ubuntu focal/mysql-8.0 amd64 Packages [6026 B]
Get:9 http://repo.mysql.com/apt/ubuntu focal/mysql-tools amd64 Packages [6426 B]
Fetched 405 kB in 3s (146 kB/s)
Reading package lists... Done
Step 4: Installing MySQL8 Server
You will be asked to enter your root password and re-enter again during this setup, and please provide the strong password one and save it in a secure place because this is the root account.
sudo apt-get install mysql-server
After MySQL8 is successfully set up, you can check the service on MySQL using the following command
sudo service mysql status

● mysql.service - MySQL Community Server
     Loaded: loaded (/lib/systemd/system/mysql.service; enabled; vendor preset: enabled)
     Active: active (running) since Sun 2021-06-06 09:42:27 UTC; 2min 20s ago
       Docs: man:mysqld(8)
             http://dev.mysql.com/doc/refman/en/using-systemd.html
    Process: 24803 ExecStartPre=/usr/share/mysql-8.0/mysql-systemd-start pre (code=exited, status=0/SUCCESS)
   Main PID: 24852 (mysqld)
     Status: "Server is operational"
      Tasks: 37 (limit: 1136)
     Memory: 341.4M
     CGroup: /system.slice/mysql.service
             └─24852 /usr/sbin/mysqld

Jun 06 09:42:26 ubuntu-s-1vcpu-1gb-sgp1-01 systemd[1]: Starting MySQL Community Server...
Jun 06 09:42:27 ubuntu-s-1vcpu-1gb-sgp1-01 systemd[1]: Started MySQL Community Server.
Step 5: Connecting to MySQL
You can now connect to MySQL Database using your root password, please beware this root password is very critical so you must keep it safe and don't share with anyone.
mysql -u root -p

Enter password:
Welcome to the MySQL monitor.  Commands end with ; or \g.
Your MySQL connection id is 8
Server version: 8.0.25 MySQL Community Server - GPL

Copyright (c) 2000, 2021, Oracle and/or its affiliates.

Oracle is a registered trademark of Oracle Corporation and/or its
affiliates. Other names may be trademarks of their respective
owners.

Type 'help;' or '\h' for help. Type '\c' to clear the current input statement.

mysql>
Step 6: Secure Installation of MySQL
After done installation and test connecting to MySQL, you need to do some basic secure installation for the security purposes of your database. You will be asked with the following checklist:
- Password validation policy (0 = LOW, 1 = MEDIUM and 2 = STRONG): 2
- Remove anonymous users? (Press y|Y for Yes, any other key for No): Yes
- Disallow root login remotely? (Press y|Y for Yes, any other key for No): Yes
- Remove test database and access to it? (Press y|Y for Yes, any other key for No): Yes
- Reload privilege tables now? (Press y|Y for Yes, any other key for No): Yes
mysql_secure_installation

Securing the MySQL server deployment.

Enter password for user root:

VALIDATE PASSWORD COMPONENT can be used to test passwords
and improve security. It checks the strength of password
and allows the users to set only those passwords which are
secure enough. Would you like to setup VALIDATE PASSWORD component?

Press y|Y for Yes, any other key for No: y

There are three levels of password validation policy:

LOW    Length >= 8
MEDIUM Length >= 8, numeric, mixed case, and special characters
STRONG Length >= 8, numeric, mixed case, special characters and dictionary                  file

Please enter 0 = LOW, 1 = MEDIUM and 2 = STRONG: 2
Using existing password for root.

Estimated strength of the password: 100
Change the password for root ? ((Press y|Y for Yes, any other key for No) :

 ... skipping.
By default, a MySQL installation has an anonymous user,
allowing anyone to log into MySQL without having to have
a user account created for them. This is intended only for
testing, and to make the installation go a bit smoother.
You should remove them before moving into a production
environment.

Remove anonymous users? (Press y|Y for Yes, any other key for No) : y
Success.


Normally, root should only be allowed to connect from
'localhost'. This ensures that someone cannot guess at
the root password from the network.

Disallow root login remotely? (Press y|Y for Yes, any other key for No) : y
Success.

By default, MySQL comes with a database named 'test' that
anyone can access. This is also intended only for testing,
and should be removed before moving into a production
environment.


Remove test database and access to it? (Press y|Y for Yes, any other key for No) : y
 - Dropping test database...
Success.

 - Removing privileges on test database...
Success.

Reloading the privilege tables will ensure that all changes
made so far will take effect immediately.

Reload privilege tables now? (Press y|Y for Yes, any other key for No) : y
Success.

All done!
Step 7: Allow Local Computer to Connect to Recent Setup MySQL
- Create a new user besides the root user
- Grant permission to the newly created user
- flush the privilege to take effect
mysql -u root -p
Enter password:
Welcome to the MySQL monitor.  Commands end with ; or \g.
Your MySQL connection id is 11
Server version: 8.0.25 MySQL Community Server - GPL

Copyright (c) 2000, 2021, Oracle and/or its affiliates.

Oracle is a registered trademark of Oracle Corporation and/or its
affiliates. Other names may be trademarks of their respective
owners.

Type 'help;' or '\h' for help. Type '\c' to clear the current input statement.

mysql> CREATE USER 'iusr'@'%' IDENTIFIED BY 'your_password_here';
Query OK, 0 rows affected (0.01 sec)

mysql> GRANT ALL PRIVILEGES ON *.* TO 'iusr'@'%';
Query OK, 0 rows affected (0.01 sec)

mysql> FLUSH PRIVILEGES;
Query OK, 0 rows affected (0.00 sec)

mysql>
Connect to MySQL using the newly created user
mysql -u iusr -p
Enter password:
Welcome to the MySQL monitor.  Commands end with ; or \g.
Your MySQL connection id is 12
Server version: 8.0.25 MySQL Community Server - GPL

Copyright (c) 2000, 2021, Oracle and/or its affiliates.

Oracle is a registered trademark of Oracle Corporation and/or its
affiliates. Other names may be trademarks of their respective
owners.

Type 'help;' or '\h' for help. Type '\c' to clear the current input statement.

mysql>
You can check your allowed connection using the below command
ss -ntlp
Allow connection to the world in MySQL configure file at path /etc/mysql/mysql.conf.d/mysqld.cnf and adding this line bind-address = 0.0.0.0
sudo vi /etc/mysql/mysql.conf.d/mysqld.cnf

sudo service mysql restart
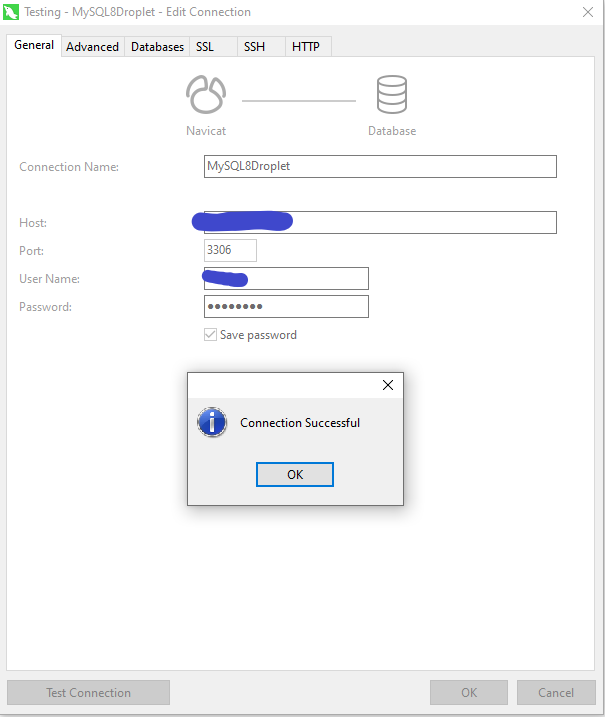
Step 8: Connecting to MySQL using Tool Navicat
Reference from Youtube Video: Installing MySQL8 in AWS EC2/Digital Ocean
About author

SETHA THAY
Software Engineer & Project Manager. I am willing to share IT knowledge, technical experiences and investment to financial freedom. Feel free to ask and contact me.
You may also like