CICD Auto Deploy Your Project Using Gitlab Runner
This is a short story of DevOps and why it exists. DevOps is about bringing together 2 traditionally contentious groups within IT organizations. Application development has primarily been measured on the number of changes, features, and defects fixed that are able to push out into production, whereas IT operations and their success is primarily measured on system stability, availability. Therefore, we have one group pushing more changes and another group might say don't push any changes due to the stability of the product. That's where the DevOps role is an important role to client's transformation strategies in general.
CICD stands for continuous integration and continuous delivery. Continuous Integration (CI) based on the definition from INFOWORLD is a coding philosophy and set of practices that drive development teams to implement small changes and check-in code to version control repositories frequently. The technical goal of CI is to establish a consistent and automated way to build, package, and test applications. Continuous Delivery (CD) picks up where continuous integration ends. CD automates the delivery of applications to selected infrastructure environments. Most teams work with multiple environments other than the production, such as development and testing environments, and CD ensures there is an automated way to push code changes to them.
In this post, we are going to learn a small technical tip that hopefully can save a small time of production deployment by applying the CD technique. Here is what we want to achieve, we want to deploy the code changes to production whenever we push the changes to git branch "prod". we have conducted this experiment on the laravel project and using GitLab as our repository.
1. Setting Passwordless SSH to server
Since we are using Digital Ocean as our server for hosting and we use a one-time password for initial setup, now we will follow this guideline to generate SSH private and public keys. If you don't have a Digital Ocean account yet click here to signup for your first-ever cloud account.
ssh -i "path_to_private_key.pem" root@ip_address_server
If you got PPK file, you have to convert it to PEM file in order to do the above SSH command.
2. Setup Gitlab Pipeline
Before going into a detailed setup, let's have some understanding of the pipeline. In GitLab, one repository has only one pipeline. The pipeline is created from one YML file at the root of the repository. We can send notifications from pipeline to pipeline and view or replay the previous instances of the pipeline. The pipeline can contain many stages.
The stage is a logical grouping of work and is executed sequentially in series. A stage can contain many jobs. Jobs run independently in a parallel mode within a stage. When all the jobs are finished, the stage is finished. ( A JOB IS SOMETHING TO DO )

GitLab Runner is a process that executes the job specified in the YML file.
- First, sign in to GitLab account and navigate to project repo and you will find menu CI/CD. You can choose the pipeline template that GitLab has provided out of the box. In our case, we will create a new one without using the template.

- Navigate to menu Editor, and click on "Create new CI/CD pipeline" and make sure you select the correct git branch you want to apply this pipeline

- As you can see in the below screen, there are 3 default stages provided build, test, and deploy. The build stage has a job called "build-job". The test stage has two jobs "unit-test-job" and "lint-test-job". Finally, the deploy stage has one job "deploy-job". You can also view your pipeline in different views such as Edit, Visualize, Lint, and View merged YAML

- Let remove all other stages and keep only the deploy stage and click the button "Commit Changes" and it will run the pipeline for the first time

- When we click on the status "passed" of the pipeline you will detail information and the jobs that have been executed

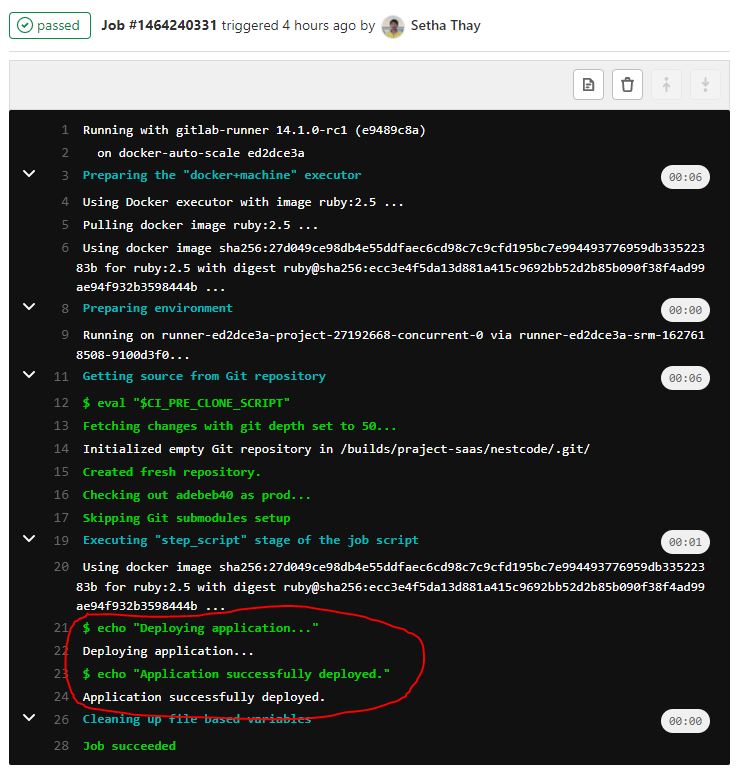
- Finally when you click on the status "passed" of job you will see the detailed execution process which has been done
3. Configure Gitlab Pipeline for Your Project
- Checkout to git branch "prod"
git checkout prod
- Getting latest code changes from prod origin
git pull origin prod
- Let's change the YML file in the root of your project (.gitlab-ci.yml) as below for adding deployment script (.deployment-script.sh)
This bash script is used for the purpose of deployment code changes to the production server
stages:          # List of stages for jobs, and their order of execution
  - deploy

deploy-job:      # This job runs in the deploy stage.
  stage: deploy  # It only runs when *both* jobs in the test stage complete successfully.
  script:
    - echo "Deploying application..."
    - bash .deployment-script.sh
    - echo "Application successfully deployed."
- Next, we have to write some bash script .deployment-script.sh which will be executed by docker of GitLab Runner
#!/bin/bash

# SSH to server and git pull from prod branch
mkdir -p ~/.ssh
echo -e "$NESTCODE_SSH_PRIVATE_KEY" > ~/.ssh/privatekey.pem
chmod 600 ~/.ssh/privatekey.pem

ssh -t -t -o StrictHostKeyChecking=no -i ~/.ssh/privatekey.pem root@your_server_ip "cd /var/www/html/nestcode/ && git pull origin prod"
This script will execute by copy the content of the private key that we generate in step 1 into a file named privatekey.pem. Then, it will ssh to the production server and go to the directory that contains the GitLab repository. Finally, we will perform the command git pull to get the latest code changes from the prod branch.
There are two additional steps we have to configure based on this bash script:
- Store SSH Private Key inside GitLab variable
- Configure passwordless when using git pull
- You can store SSH Private Key inside GitLab by click on menu Settings then choose CI/CD and find section Variables and then add new variable by giving key and value as the screenshot below

- We will use deploy tokens to config our repository on the production server to achieve passwordless functionality so that the deployment script will run smoothly without any prompt issue.

4. Execute Your Pipeline to Check Result
Now you can push the updated YML file to the git repository and then the pipeline will be performed as well. The pipeline that you create inside GitLab will trigger to execute whenever there are code changes that happened in branch "prod" of your git repository.

WE hope this technique will help you in some ways for your project deployment. It is a small tip but it will save you a lot of time 
THANK YOU
Find Us @
Facebook
Telegram
Twitter
LinkedIn
About author

SETHA THAY
Software Engineer & Project Manager. I am willing to share IT knowledge, technical experiences and investment to financial freedom. Feel free to ask and contact me.
You may also like